Showing posts with label Glue-up. Show all posts

Tuesday, October 6, 2015

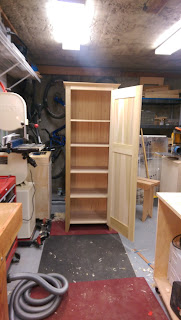
Linen Pantry


Natalie wanted a linen cupboard for the guest bathroom.


We found some examples of shaker style cupboards that she liked.


I drew some quick plans and rounded up some material, poplar lumber and birch plywood.


A few hours with the track saw and a couple dozen dominos later, I had a case.


Poplar bead board made the door panels.


After glueing everything up I installed the hardware and trimmed the door to fit.


A little filler and it was time for some milk paint.


Milk paint was an interesting experience.  After a couple tries I got a decent mix.  I found that mixing the powder  into a thick paste first helped.  Then I could thin it down and let it sit overnight.  Straining the mix before application helped.


Once the painting was complete I set up out on the deck and sprayed  few coats of shellac to give the paint a bit more depth and protection.


Sunday, January 18, 2015

Whiskey Cabinet Construction

All of the lumber for the case and door frame is from one board.  That board was part of a batch of lumber I bought last summer from a guy who was retiring. The board was about 11" wide and had been thicknesses to 3/4". It has a bit of a cup to it so I decided it would work well for this cabinet as i didn't want the case to be a full 3/4" thick.  


I was able to get all the case parts and the shelf from that one piece.  The rails and stiles for the door were from the offcuts of the corresponding case pieces. This let me utilize nearly the entire board and ensured a good grain and color match for the door.


After processing the stock for the case, I laid out and cut the dovetails for the corners. Because the top and bottom overhung the sides I decided to go with half tails on the ends.  For transferring the tail to the pin board I tried out Chris Schwarz's "Dovetail Ruler Trick".  Tacking a wooden ruler on would be even better, but clamping a metal ruler certainly helped.


With the case complete, I cut dados in the sides for the shelf.  I ended up cutting them by hand for the practice and because I didn't feel like taking the route out of the table.  This operation was certainly one of those times where trying to use the router may have taken longer by the time I got it set up. The groove for the back panel was cut at the router table as I hadn't received this yet.


Having spent some time trying to get an old Stanley #55 to work well, this tool is a welcome change. 


Next up was to finish the door panel.  I had decided to finish this project with General Finished EnduroVar and it went on really nicely.  This finish has all the good characteristics of a water borne finish, easy clean up, dries fast, and doesn't smell terrible while also having the nice warm color of a oil varnish. I found that cheap foam brushes were the best way to apply this, though I suspect it will spray nicely when the weather is warm enough to finish outside.


I lightly sanded between coats with 220 to smooth things out, and then finished the final coat with 3M scotchbrite pads.  I found that they stick pretty well onto the ROS which makes bringing the entire panel up to an even sheen a piece of cake.


The door frame was pretty straightforward, grooves on the router table for the panel and dominos for the joints. Old Brown Glue to stick it all together.


To protect the panel I covered it with painters tape.  Then it was time to sand the frame smooth and move onto hardware installation.


As I was using knife hinges, I had to to cut the mortises for them before I glued up the case.  When it came time to glue up the case I installed the door to make sure everything lined up. 


And the final product, installed and serving admirably. It is hung with a French cleat.  I offset the back panel 3/8" in to allow for the thicker french cleat.  The fixed portion of the cleat is glued directly onto the plywood back and the top. The wall mounted cleat was attached to the wall with 3 Wall dog screws, one of which is into a stud so it should hold up to a full load of the good stuff.

I've got better pictures of the finished piece here.

Saturday, February 8, 2014

TV Stand Part VIII - Almost There.

Hopefully the next post about this project will be the last. This has been my most ambitious project to date.  The final count is just over 100 individual parts and several new techniques for me. Another milestone is that I think I actually spent more on wood for this project than on project specific tools.


I am pleased with the way the drawers came out.  They all operate smoothly enough and the figure on the fronts really looks nice with some finish on it.


The end that gets a bit of sun through the shop window is already starting to darken.  I am looking forward to seeing the colors develop in this piece over the next year or two.


The dowel reinforced rabbet construction for the drawers worked out well.  I think the look fits the piece better than dovetails would have and they are rock solid.


The breadboard ends for the top went smoothly.  I ended up with a full width 1/4" long tenon with two narrower 1" long tenons on each end of the two top boards.  The outer tenon on each is glued and pinned and the inner one is pinned with the hole in the tenon slotted to allow for movement.  

 Any movement should be toward the center which makes makes mounting a bit easier as there should be minimal movement at the mounting points.

I've started working on designs for several new projects.  I think the highest priority is probably a side table to go with the TV stand.  Also on the list are a sideboard to go with the whiskey cabinet I made last year and possibly a Morris arm-chair.  


Thursday, January 16, 2014

TV Stand Part VII - Drawers


After finishing off a hardwood floor installation at my father in law's place...


..and in between taking advantage of the new snow,  I have been getting some time in the shop.


With the case complete, I've moved on to the drawers.  First thing on my list was to fit the drawer fronts to the openings in the case. 


Christmas gift cards were well spent on a Veritas Low-Angle Jack with 25 deg blade which worked wonderfully well on the shooting board. The tenon saw has a nice balance to it.


The drawers are a simple rabbet construction and will have dowels to reinforce them.


I can't wait to get some finish on the lower drawers.


Tonight the first of the drawers was fit to the case, so far so good.


Tonight the second drawer was fit. I really like the look of the dowels in the rabbets.


Two more drawers and it's time to move on to the top.

Monday, December 23, 2013

TV Stand Part VI - Slow and Steady

The last month has been as busy as usual with Christmas parties and skiing.  I have managed to get some time in the down in the shop.


I finally got all of the parts pre-finished and the sub-assemblies glued together.  This was the last dry fit of the inner shelf assy before I finished the front edges.


The glue-up went pretty well, a couple rehearsals were key.  Using a glue that sets pretty slow (Old Brown Glue) certainly didn't hurt either.


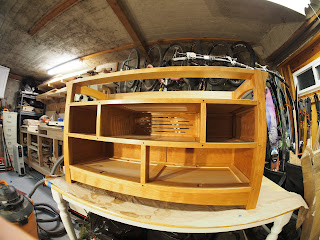
In preparation for  a Christmas hut trip I picked up a fisheye (15mm equivalent) lens for the camera.  Here is the TV stand case all glued up and just about ready to go.  There are just a couple more details to wrap up on the case.


With the fisheye I can finally get  a decent shot of the shop.  It's cozy but I am settling into some routines and find it a rather pleasant place to be.  Last year I was running a propane heater while I was down there, but found it to be loud and smelly.  This year I have been trying out a small electric heater that I leave on with the thermostat set around 55.  This seems to work much better as it keeps the shop from getting so cold in the first place and things stay a much more constant temperature.  With the cost of Propane I think running the electric heater on low might even be cheaper than blasting the shop while I'm working.


I've started milling the boards for the drawer fronts, saved the best for last.  These have some really nice curl and should be a nice touch.


The top is also in its early stages. With a little cleanup the boards for the top are looking quite nice, they even have a bit of curl as well.  I am still trying to decide on how wide to make the breadboard ends.


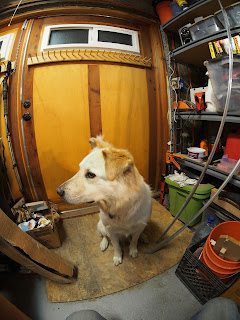
And a couple pictures of my shop helper.


I had to run to the lumber dealer for some baltic birch to make drawer bottoms and this little guy snuck into my car.  It is a beautiful 10' long by 14in wide piece of walnut.  There were a couple big knots right in the middle so I had it cut down to fit in the car.  The other half isn't nearly as nice as the one top, but is still quite usable.  For the price it was worth it for just the one shown.  I've managed to collect a bit of a stash walnut at this point so I think my next project might have to make use of it.  I just need to figure out what that is.

We are off to the Opus hut for some christmas skiing.  Pictures will surely follow.  

Merry Christmas