Showing posts with label Sharpening. Show all posts

Monday, November 25, 2013

The end is in sight ?

With a few evenings here and there I have been making progress on the TV stand.  Checking things off the list always feels good.

Most of my time lately has been putting finish on parts and beginning to glue up sub-assemblies.  So far I am really happy with how much easier it is to finish the individual parts.


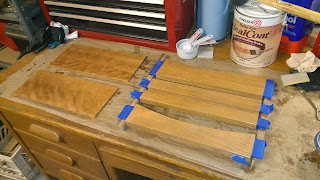
Blue tape does a good job keeping the shellac off of the tenons.  I have been applying the shellac with a brush and then wet sanding with 320 and progressively finer scotch brite pads.  I have found that the pads resist clogging much better than sand paper does, but the 320 does the initial leveling a bit faster. As long as I keep the 320 grit lubricated with mineral spirits its seems to work ok. 


The end assemblies are finished and glued up. I am pleased with the overall look.


The back frame is glued up and I am in the process of getting finish on that.  Luckily, 4 of the 5 panels can be removed for that process.


I finally got around to buying a spoke shave.  Found one on Ebay for $20.  A few minutes of tuning on a diamond plate and it was ready to go.  The XX Coarse DMT Dia-Sharp plate is awesome.  It cuts much faster than the X Coarse Duo-Sharp.


I have also made and fitted the drawer guides into the shelf assemblies. I ended up just cutting the mortises for those by hand with a chisel and router plane. It was probably faster than setting up a jig for the router and I had a lot more control over the results.


Dry fit and ready to go.  I am thinking about just attaching them with two screws so that they could be removed/replaced in the future if needed.


Now that the TV stand is really starting to come together and most of the details have been worked out, I have been starting to think about the next project... next furniture project anyway.  There are a few house projects that are higher on the list.  The pictures above are of a Birdseye maple dresser that my wife would like a matching side table for.  I don't plan on trying to duplicate the carved details but I think that the leg profile and some of the trim details will be included.  I need to get a good picture of the top, it has pretty heavy figure that looks terrific.  Whenever I get far enough along on this design to need lumber I think I will probably be calling the guys at Bell Forest Products as they seem to know there way around Birdseye maple.



Sunday, September 22, 2013

TV Stand - Part II, Making dust.

This weekend I dug into the pile of lumber for the tv stand.  I had already gotten the legs milled square so next up was all of the stretchers for the case.
Leg blanks on the right, pile of stretchers on the left.
The one piece of equipment that I really wish I had room for is a jointer.  Until the day I come across a deal too good to pass up and just make room for one I'm working on my upper body conditioning.  working my way through that stack of lumber above proved to be great practice.  I really do appreciate how nice cherry is to work with.
First step was to touch up the blade on the jointer.  
Next up are traversing passes with the #5.  The cambered blade makes quick work of the rough cut surface. 

Then on to the #7. 
I ended up breaking out the feeler gauges to speed things up. ..yes speed them up.  With the gauges I had a way of knowing it was flat enough and not chasing after that last tiny bit of light under the straight edge.  Went for 0.005" flatness on the faces and 0.002" on the edges.
Checking the edge to make sure its still square.
Finally done jointing.
I spent the better part of saturday getting the rest of the parts jointed.  Then it was time for a bike ride.  fall is on its way, there was some color already up high.


Today I took the dog out on the bike first thing to wear her out then it was back to the shop.

Got the router set up to cut the mortises on the legs.
One new addition the arsenal for this project was a edge guide for the router. It sure beats cutting mortises at the router table.  After one un-intended practice leg and some more milling practice I made some real progress.  I found that plunging to full depth at either end of the mortise first made things much easier.

Then it was on to finishing up the milling for the stretcher stock.  I'm not sure whether the thickness planer or the bandsaw were the best addition to the shop this year, but I'm glad I've got both of them.

The final task for the evening was to get the table-saw and bandsaw set up to cut the tenons.  Test boards fit well but I'm still not sure about cutting the tenon cheeks on the band saw.  I may end up putting the dado stack on the table saw even though it doesn't leave quite as clean a surface.


That's all for tonight.


Monday, April 29, 2013

Sharpening...


A necessary chore before getting started on the next project.  I recently upgraded from sandpaper on granite tile...aka scary sharp..to a diamond plate and water stone combo.  So far it is a huge improvement in both ease of use and results.

After hours of reading about other people's systems and agonizing over which dubbed to start with I decided that I just need to get something and start experimenting.
I ended up buying a DMT Duosharp coarse/extra fine and the Norton 4000/8000 combo.


First the DMT... I am really liking how quickly it cuts for the respective grit size and how even of a scratch pattern I am getting.  I do think that I will likely pick up an extra course plate to speed up the grinding as I do not have a grinder. It does seem to cut much better if it is kept nice and wet to help the swarf flow out of the way.


My main reservation with the Norton stone was that the 4000 grit needed to be soaked prior to use.  This hasn't turned it to be much of an issue as I seem to do quite a bit of sharpening whenever I get set up.  Being able to just throw some water on the 8000 and go to work is nice for a little touch up while working. 


The only complaint so far is that the 8000 grit side of the stone had a pretty bad crown to it.  10 minutes with some sandpaper and the DMT and it is mostly flat but the corners are still a bit low. This is visible in the pictures.  Since the lowest spots are almost 1/32  low I am just living with it and not using the corners.  I figure I will eventually wear down the middle of the stone enough that it will be truly flat across the whole face.